
Table of Contents
ToggleInstalling a dishwasher isn’t as intimidating as it looks. Most homeowners with basic plumbing and electrical skills can handle a dishwasher hookup in an afternoon, saving several hundred dollars in installation fees. The process involves three core connections: water supply, drainage, and electrical power. Miss one detail, though, and you’re looking at leaks, blown circuits, or code violations. This guide walks through everything needed for a safe, code-compliant dishwasher connection, from prep work to final testing, so the install goes smoothly the first time.
Key Takeaways
- A dishwasher hookup requires three core connections—water supply, drainage, and electrical power—and most homeowners with basic skills can complete the installation in an afternoon while saving hundreds on professional fees.
- Always verify local building codes and permit requirements before starting a dishwasher hookup, as regulations vary by jurisdiction and may require licensed electrician involvement for electrical work.
- Create a high loop or air gap in the drain line to prevent backflow contamination—this is a critical code requirement and the most common source of installation callbacks.
- Match electrical wire gauge to breaker rating (14-gauge for 15-amp, 12-gauge for 20-amp) and use a dedicated circuit to avoid tripped breakers and fire hazards.
- Run a complete test cycle with water and power before fully securing the dishwasher in place, checking for leaks, proper draining, and correct electrical function to catch issues while the unit is still accessible.
Understanding Dishwasher Hookup Requirements
Before turning a single wrench, verify what the local building code requires. Most jurisdictions follow the International Residential Code (IRC) and National Electrical Code (NEC), but amendments vary by city and county. Some areas require permits for any electrical or plumbing work: others allow homeowner exemptions for appliance replacement.
A standard dishwasher needs three hookups:
- Water supply: A 3/8-inch compression fitting tapping into the hot water line under the sink. Most units require 20-120 psi water pressure.
- Drain connection: A 5/8-inch or 7/8-inch drain hose connecting to the sink drain or garbage disposal, with a high loop or air gap to prevent backflow.
- Electrical supply: A 120-volt, 15-amp or 20-amp dedicated circuit with a grounding conductor. Hardwired or cord-and-plug connections are both acceptable, depending on local code.
Check the dishwasher manufacturer’s installation manual for specific clearances and rough-in dimensions. Most built-in models require a 24-inch-wide opening with at least 34 inches of height and 24 inches of depth. Counter height is typically 36 inches, leaving room for adjustable leveling legs.
If the existing space lacks a dedicated circuit or water shutoff valve, those upgrades must happen first. Running new electrical requires working in the panel, if that’s outside the comfort zone, hire a licensed electrician. Same goes for major plumbing reroutes. Dishwasher hookup itself is DIY-friendly, but the prep work sometimes isn’t.
Essential Tools and Materials for Installation
Gather everything before starting. Nothing stalls a project faster than mid-install hardware store runs.
Tools needed:
- Adjustable wrench or basin wrench
- Channel-lock pliers
- Screwdrivers (flat and Phillips)
- Drill with bits (for mounting brackets)
- Torpedo level
- Wire strippers and electrical tape
- Tubing cutter (if cutting copper or braided line)
- Bucket and towels (for water spillage)
- Voltage tester or multimeter
Materials and parts:
- Braided stainless steel water supply line (most come 6 feet long: choose length based on distance from shutoff to dishwasher)
- Discharge hose (often included with the dishwasher: if not, buy a 5/8-inch or 7/8-inch reinforced hose)
- 90-degree elbow fittings (brass or plastic, depending on drain setup)
- Hose clamps (stainless steel, sized for hose diameter)
- Wire nuts (if hardwiring)
- Teflon tape (for threaded fittings)
- Cable connector or strain relief (for electrical entry)
- Air gap or high-loop kit (if required by code)
Some dishwashers ship with a basic install kit, but double-check what’s in the box. Cheap plastic fittings are worth upgrading to brass or stainless. A braided supply line beats rubber, it’s less prone to kinking and lasts longer.
Safety gear: Wear safety glasses when drilling or working under the sink. Gloves protect hands from sharp edges and grime. If cutting into drywall or cabinetry for access, a dust mask is smart.
Step-by-Step Dishwasher Hookup Process
Work methodically. Rushing through a dishwasher connection invites leaks and callbacks.
Connecting the Water Supply Line
Shut off the hot water supply valve under the sink. Open the faucet to relieve pressure, then disconnect any existing supply line if replacing an old unit.
Thread the braided supply line onto the dishwasher’s inlet valve, usually located at the front lower left. Hand-tighten, then snug with an adjustable wrench, one-quarter to one-half turn past hand-tight. Over-tightening crushes the compression ferrule and causes leaks.
Route the supply line through the cabinet opening toward the sink. Connect the other end to a dual-outlet shutoff valve or tee fitting on the hot water line. Wrap threads with Teflon tape (three wraps clockwise) before tightening. If the existing shutoff is a straight-stop valve, replace it with an angle-stop or add a tee adapter to split the line between sink and dishwasher.
Turn the water on slowly and check for drips. A few drops at the compression nut can usually be stopped with a slight wrench adjustment. Puddles mean the fitting needs to be redone, back it off, inspect the ferrule, and reconnect.
Many plumbing hookup guides recommend using a braided line with built-in shutoff, which simplifies future maintenance.
Installing the Drain Hose Properly
The discharge hose carries dirty water from the dishwasher to the sink drain or garbage disposal. Improper drain connection is the number one cause of installation callbacks.
If connecting to a garbage disposal, remove the knockout plug inside the dishwasher inlet nipple (usually on the side). Use a screwdriver and hammer to pop it out from inside the disposal, then retrieve the plug with pliers or a magnet. Forgetting this step means the dishwasher won’t drain, ask me how I know.
Slip a hose clamp over the discharge hose, then push the hose onto the disposal inlet or tailpiece wye fitting. Tighten the clamp with a screwdriver until snug. The hose should slide on at least 1 inch for a secure seal.
Critical: Create a high loop by securing the drain hose to the underside of the countertop with a bracket or cable tie. The loop should rise as close to the counter as possible, higher than the sink’s flood level. This prevents dirty sink water from siphoning back into the clean dishwasher. Some jurisdictions require an air gap instead of a high loop. An air gap is a small chrome or plastic dome that mounts in a sink hole or countertop, providing a physical break in the drain line. Check local code.
Trim excess hose with a utility knife if needed, but leave some slack for service access. Kinks or sags in the line cause drainage issues and standing water. When installing a proper drainage setup, the hose should have a gradual downward slope from the high loop to the disposal or drain.
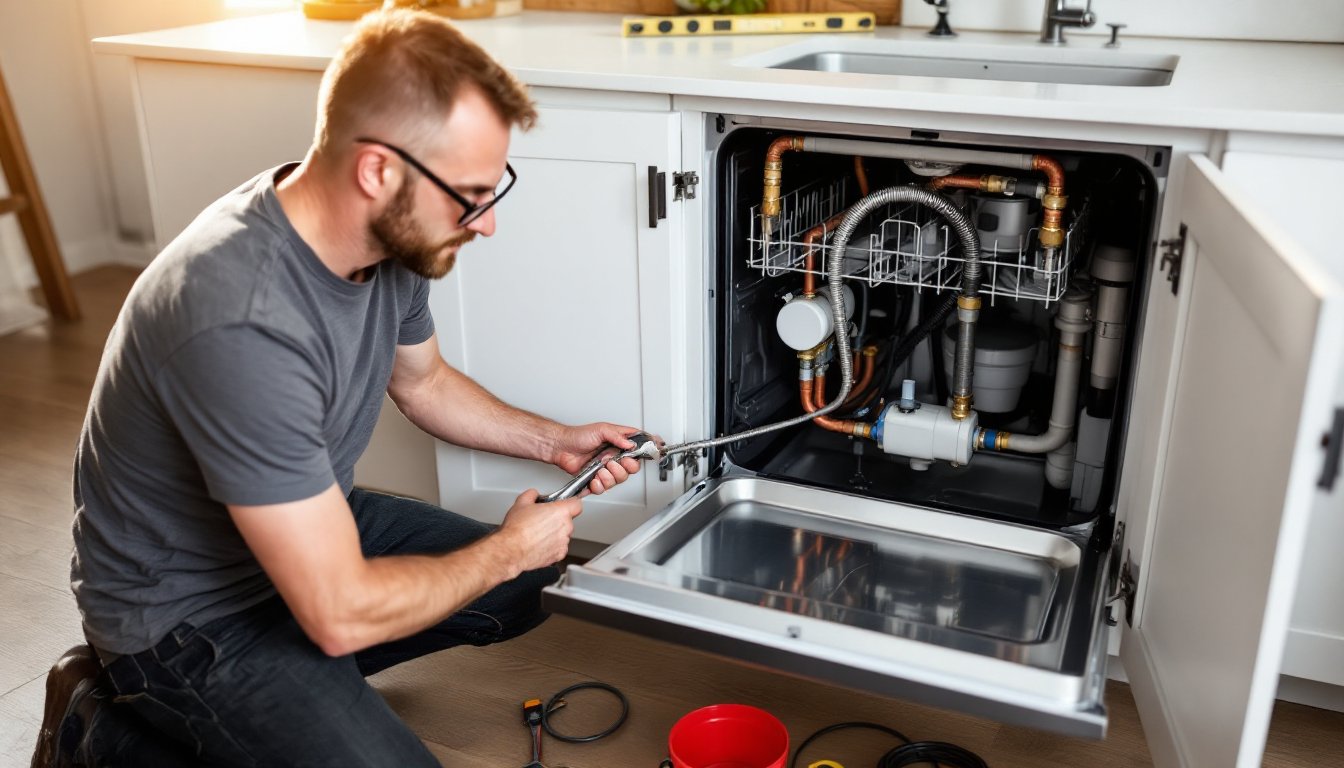
Electrical Connection and Safety Considerations
Turn off power at the breaker before touching any wires. Use a voltage tester to confirm the circuit is dead, test both hot and neutral to ground.
Dishwashers are typically hardwired or use a cord-and-plug. Hardwiring is more common in new construction: a 14/2 or 12/2 NM cable (with ground) runs from the panel to a junction box near the dishwasher. For a 15-amp circuit, use 14-gauge wire: for 20-amp, use 12-gauge. The dishwasher usually draws 10-15 amps at peak, so a 15-amp circuit is usually adequate, but verify the appliance nameplate.
Remove the junction box cover on the front lower section of the dishwasher. Feed the electrical cable through a cable connector or strain relief to protect the wires from sharp edges. Strip about 6 inches of sheathing and 1/2 inch of insulation from each conductor.
Connect wires with wire nuts: black to black (hot), white to white (neutral), and bare copper or green to the ground screw or wire. Tug each connection to ensure it’s solid. Fold wires neatly into the box and replace the cover.
If using a cord-and-plug setup, install a receptacle box under the sink (if not already present) and plug the dishwasher’s power cord in. This method is easier for future service since the appliance can be unplugged without killing the breaker.
Never use an extension cord or a shared outlet. Dishwashers need a dedicated circuit per NEC guidelines. Shared circuits with disposals or other appliances can trip breakers under combined load. For additional guidance on electrical hookup procedures, consult manufacturer specs and local code.
Restore power and run a test cycle. Listen for the fill valve, watch for leaks under the sink, and confirm the unit drains completely. If the dishwasher hums but doesn’t fill, recheck the water supply valve and inlet screen for debris.
Common Hookup Mistakes to Avoid
Even experienced DIYers trip up on these.
Skipping the high loop or air gap. Without backflow prevention, contaminated water can siphon into the dishwasher. It’s not just gross, it’s a code violation in most areas.
Over-tightening compression fittings. More torque doesn’t mean a better seal. Crushing the ferrule creates leaks. Hand-tight plus a quarter turn is the rule.
Forgetting the disposal knockout plug. This ranks as the most common rookie mistake. The dishwasher will fill but never drain, and the pump runs continuously.
Using the wrong wire gauge. Running 14-gauge wire on a 20-amp breaker is a fire hazard. Match wire size to breaker rating, and confirm the dishwasher’s amp draw.
Not leveling the unit. An unlevel dishwasher leaks, doesn’t drain fully, and puts stress on door hinges. Use a torpedo level on the front edge and adjust the legs until it’s plumb. Most models have front leveling legs and rear roller wheels.
Ignoring clearances. Jamming the dishwasher tight against side cabinets can pinch hoses or wires. Leave 1/8 inch on each side for vibration. Secure the unit with mounting brackets to the underside of the counter, don’t rely on friction alone.
Reusing old, brittle hoses. If the existing discharge hose is cracked or stiff, replace it. Rubber degrades over time, and a failure mid-cycle means a flooded kitchen.
Skipping a test cycle before pushing the unit in. Run water and power for at least five minutes while the dishwasher is accessible. If something leaks or shorts, it’s easier to fix before the unit is wedged into the cabinet.
Dishwasher hookup is straightforward, but details matter. Take time on the prep, double-check connections, and don’t skip the test run. Done right, the installation is solid for years. Done hastily, it’s a callback waiting to happen.