
Table of Contents
ToggleA bathroom remodel isn’t just about new tile and fixtures, it’s about transforming one of the most-used rooms in your home from cramped and outdated to functional and inviting. Before and after photos show the true power of smart design decisions, whether you’re working with a $3,000 budget or a full gut renovation. These transformations illustrate how choosing the right materials, updating layouts, and addressing structural issues can completely change the look and usability of a bathroom. This guide walks through 15 real-world remodels at every budget level, highlighting the design elements that made the biggest impact and offering actionable planning steps for homeowners ready to tackle their own projects.
Key Takeaways
- Bathroom remodel before and after photos provide a realistic roadmap for what’s achievable within your space and budget, helping distinguish between cosmetic updates and structural work needed.
- Budget-friendly bathroom remodels under $5,000 can deliver dramatic results through cabinet painting, fixture swaps, and peel-and-stick updates without moving plumbing or electrical systems.
- Strategic lighting upgrades, large-format tile, and walk-in shower conversions are high-impact design elements that appear consistently in successful bathroom remodel transformations.
- Mid-range remodels ($8,000–$20,000) allow for layout changes and quality materials, but hiring professionals for tile work, shower pan installation, and plumbing is essential to avoid costly water damage.
- Proper sequencing (demolition, rough-ins, waterproofing, then finishes), pulling required permits, and allocating a 15–20% contingency budget protects your bathroom remodel investment and ensures code compliance.
Why Before and After Photos Matter for Your Bathroom Remodel
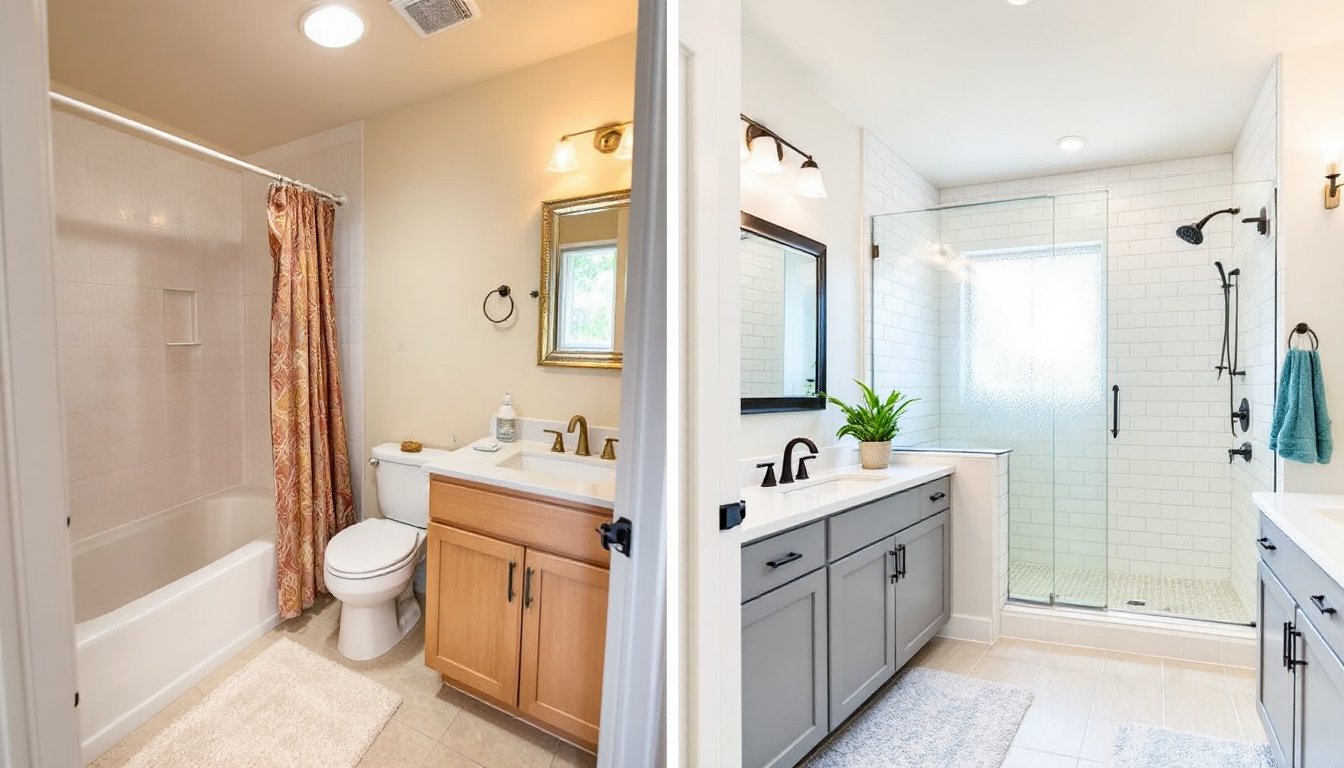
Before and after images do more than inspire, they provide a realistic roadmap for what’s achievable within your space and budget. When homeowners see similar square footage, layout constraints, or outdated features transformed, it clarifies what’s cosmetic versus what requires structural work.
Photos also reveal common problem areas: poor lighting, wasted corner space, or ventilation issues that lead to mold. Comparing the before state helps identify whether you’re dealing with surface-level updates (paint, hardware, vanity swap) or deeper concerns like rotted subfloor, outdated plumbing behind walls, or inadequate electrical for modern fixtures.
These visuals set expectations for contractors, too. Bringing reference photos to initial consultations speeds up communication about tile patterns, fixture finishes, and layout changes. It’s easier to point at a walk-in shower conversion than to describe one, and it helps contractors provide more accurate estimates when they understand the scope you’re aiming for.
Finally, before and after documentation protects your investment. Photographing existing conditions, especially behind walls during demolition, creates a record for permits, insurance, and future resale. Buyers appreciate seeing the quality of work that went into hidden systems like waterproofing membranes and proper vent fan ducting.
Budget-Friendly Bathroom Makeovers That Deliver Big Impact
Budget remodels (under $5,000) focus on cosmetic updates that don’t require moving plumbing or electrical. These projects prove you don’t need to gut a space to see dramatic results.
Transformation 1: A builder-grade bath with almond fixtures got a fresh look by painting cabinets in a matte navy, replacing brass hardware with brushed nickel, and installing peel-and-stick tile over the existing backsplash. Cost: $1,200. The key was prepping the laminate cabinet doors with TSP cleaner and a bonding primer before topcoat.
Transformation 2: Outdated fiberglass tub surround replaced with a DIY bead-board paneling system and waterproof paint. New chrome faucet, re-grouted floor tile, and a frameless mirror doubled the perceived size. Total: $2,800. Homeowner used PVC bead-board rated for wet areas instead of MDF to avoid moisture damage.
Transformation 3: A two-week budget remodel in a San Francisco row house kept the existing tub and toilet but refinished both, added open shelving in reclaimed wood, and swapped a pedestal sink for a small vanity with storage. The DIY approach and salvaged materials kept costs under $4,500.
Transformation 4: Dated pink tile stayed in place, but walls were painted a soft gray, and new matte black fixtures created contrast. A vintage rug, plants, and updated lighting transformed the feel for under $1,000. Sometimes working with existing tile color instead of against it yields the best ROI.
Transformation 5: Laminate countertop refreshed with epoxy coating to mimic marble, plus a new toilet, faucet, and mirror. Homeowner applied two coats of epoxy over the old vanity top, which cured in 72 hours. Cost: $3,200, with the epoxy kit running about $150.
Mid-Range Bathroom Transformations Worth Every Dollar
Mid-range remodels ($8,000–$20,000) allow for layout tweaks, quality materials, and some plumbing or electrical changes. Expect to hire pros for tile work, shower pan installation, or moving a vanity.
Transformation 6: A 5×8-foot bath with a tub/shower combo converted to a walk-in shower with ceramic subway tile and a frameless glass door. Removed the tub, rebuilt the curb with cement board and RedGard waterproofing, installed a linear drain for better water flow. New vanity, quartz top, and recessed lighting. Cost: $14,000. Required a permit for plumbing and electrical changes.
Transformation 7: Jack-and-Jill bath split into two separate spaces by adding a second door and pocket door hardware. New flooring throughout (luxury vinyl plank over existing subfloor after leveling), dual vanities, and updated fixtures. Hired a carpenter for framing and door install. Total: $11,500.
Transformation 8: Outdated pedestal sink replaced with a 48-inch double vanity. Homeowner discovered the waste line needed rerouting to center under the new cabinet, hired a plumber for that section but handled tile backsplash and painting themselves. Mixed DIY and pro work kept the budget at $9,800.
Transformation 9: 1980s bath with popcorn ceiling, carpet (.), and gold fixtures transformed with new tile flooring (12×24-inch porcelain laid in a brick pattern), drywall ceiling with can lights on dimmer switches, and a custom tile shower. Electrician added a GFCI circuit for the new vanity lights. Cost: $18,000.
Transformation 10: Small powder room expanded by borrowing 18 inches from an adjacent closet. Required a structural engineer to confirm the wall wasn’t load-bearing. New drywall, wainscoting, hexagon floor tile, and a wall-mounted toilet to save floor space. Budget: $12,500, including engineer fees and permit costs.
Luxury Bathroom Remodels: From Dated to Designer
High-end remodels ($25,000+) involve complete overhauls: moving walls, upgrading plumbing and electrical systems, custom cabinetry, and premium finishes. These projects often require an architect, designer, and multiple licensed trades.
Transformation 11: Master bath expanded into an unused bedroom. Demolished shared wall (load-bearing, required steel beam installation), added a freestanding soaking tub, walk-in shower with body jets and rain head, heated floor tile, and custom dual vanities in walnut. Plumber ran new supply lines in PEX and updated drain venting to code. Cost: $52,000.
Transformation 12: Gut renovation of a 1960s bath with serious water damage behind the tub. Subfloor replaced (¾-inch tongue-and-groove plywood), walls reframed, and all new plumbing and electrical. Installed a curbless shower with a Schluter system for waterproofing, large-format porcelain tile, quartz counters, and a smart mirror with integrated lighting. Total: $38,000. Passed all inspections on the first go.
Transformation 13: Historic home bathroom preserved original clawfoot tub and refinished it, but updated everything else: marble hex floor tile (matching the era), custom vanity built from reclaimed wood, polished nickel fixtures, and upgraded ventilation with a Panasonic WhisperCeiling fan (0.3 sones, 110 CFM). Budget: $28,000, including lead paint abatement.
Transformation 14: Contemporary remodel with a floating vanity, wall-mounted toilet, backlit mirror, and floor-to-ceiling tile in the shower. Frameless glass, matte black fixtures, and underfloor heating controlled via smartphone. Electrician installed dedicated 20-amp circuits for heated floor and towel warmer. Cost: $45,000.
Transformation 15: Spa-inspired bath with natural stone, a steam shower, dual rainfall heads, and a custom teak bench. Required upgraded ventilation to handle steam (commercial-grade exhaust fan rated for high humidity). Plumber installed a steam generator and thermostatic mixing valves. Total: $60,000+.
Key Design Elements That Make the Biggest Difference
Certain upgrades show up repeatedly in successful bathroom remodel before and after transformations, these elements deliver visual impact and functional improvements.
Lighting: Swapping a single overhead fixture for layered lighting (recessed cans, vanity sconces, and accent lights) changes the entire mood. Dimmer switches and LED bulbs (2700K–3000K for warm light) prevent harsh shadows. Many design sites like HGTV showcase how strategic lighting elevates even modest remodels.
Tile choices: Large-format tile (12×24-inch or bigger) reduces grout lines and makes small spaces feel larger. Subway tile remains a classic, but varying the layout, vertical stack, herringbone, or offset brick, adds interest without extra cost. Always use unsanded grout for joints narrower than ⅛ inch.
Shower upgrades: Replacing a tub/shower combo with a walk-in shower (especially with a low-profile or curbless base) opens up floor space. Frameless glass doors feel more modern than framed, and a niche (built-in shelf) for toiletries beats suction-cup caddies.
Vanity and storage: A floating vanity creates the illusion of more floor space. Drawers beat cabinet doors for accessibility, soft-close hardware is worth the extra $30 per set. If you’re keeping the existing vanity, swapping the countertop to quartz (more durable and lower maintenance than granite) and adding new hardware refreshes the look for a fraction of replacement cost.
Ventilation: An undersized or missing exhaust fan leads to mold and peeling paint. Size the fan to your bathroom’s cubic footage (length × width × height, then multiply by 0.13 for CFM rating). Duct it to the exterior, never into the attic. This often gets skipped in budget remodels but causes expensive problems later.
Flooring: Porcelain or ceramic tile outperforms vinyl in wet areas, though luxury vinyl plank (LVP) with a waterproof core works for powder rooms. For radiant heat, use a crack-isolation membrane under tile to accommodate thermal expansion.
Planning Your Own Bathroom Transformation
Start with a realistic budget that includes a 15–20% contingency for surprises (rotted framing, outdated wiring, asbestos in old flooring). Resources like ImproveNet offer cost breakdowns by project type and region, which help set expectations before meeting contractors.
Measure carefully. Sketch your existing layout with dimensions, include door swing, window placement, and plumbing locations. Use graph paper (¼ inch = 1 foot scale) or a free tool like RoomSketcher. Note whether you’re working with a standard 5×8-foot bath or something custom.
Identify what’s structural versus cosmetic. If you’re moving a toilet, you’ll need a plumber and likely a permit. Same for relocating electrical or removing walls. Cosmetic updates (paint, fixtures, vanity swap) can often be DIY if you’re comfortable with basic tools.
Pull permits when required. Most jurisdictions require permits for plumbing, electrical, or structural changes. Skipping this risks failed inspections during resale and liability if faulty work causes damage. Check your local building department, many have online permit lookup and application.
Sequence matters. Demo first, then rough-in plumbing and electrical, followed by drywall and waterproofing. Tile and fixtures come last. Doing things out of order (like installing a vanity before tile) creates costly rework.
Hire strategically. If budget is tight, handle demolition, painting, and finish work yourself but hire pros for tile setting, shower pan installation, and anything involving water or electrical behind walls. A poorly set shower pan can cause $10,000+ in water damage, worth paying a pro $1,500 to do it right.
Material lead times: Certain items (custom vanities, special-order tile, some faucet finishes) can take 6–12 weeks. Order early or you’ll delay the whole project waiting on a backordered part.
Conclusion
Bathroom remodel before and after projects reveal that thoughtful design, quality materials, and proper execution matter more than budget size. Whether refreshing fixtures on $2,000 or gutting a space for $50,000, the biggest wins come from addressing both aesthetics and function, lighting, ventilation, waterproofing, and layout. Plan thoroughly, respect building codes, and don’t skip the unglamorous prep work. The transformation photos that impress the most are the ones built to last.